|
||||||
| ZOOM GFX-8 Footswitch Repair Reliability Mod ... |
||||||
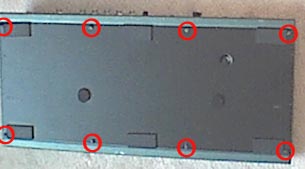
| You're just about to launch into the solo/wank part of your favourite tune, you bounce across the stage and stomp on the footswitch of your G and the switch pops off and goes flying across the floor. You dive after it crashing into the drums sticking your guitar's neck thru the kick and impaling the drummer's nuts with the headstock of your pointy 80's axe, the p'd off drummer shoves his drumsticks up your nose and brings his biggest cymbol crashing down on your head, meantime the bass players tripped over your sprawled body and flown into the keyboard rack - the audience are standing up screaming for an encore - the last time they saw someone end a show like this was when Kurt was still alive, and you're lying on the ground grinning cos you're clutching your wayward footswitch in your sweaty palm! So.... how to avoid getting your snot on your drummer's sticks? Read on..... First off, a bit of history..... Just off the subject of repair here, I've not tried to get replacement switches, maybe ZOOM does sell them (I doubt it), but that would be the first thing to try. If your switch breaks off, then a replacement will pop right back in without taking any screws off. Read right to the end before trying any of this, and remember it may be an idea to wait til your footswitches do pop off before diving in there. Brief Instructions: First off get a container to keep the loose parts in - springs, screws etc. An empty 1 liter ice-cream tub works well. 1: Turn the GFX unit over, and using a star/philips screwdriver (not a kitchen knife!) remove the 8 black screws holding on the black back plate (circled in red). Lift off the back plate to expose the circuit board etc. Keep the screws in your container.
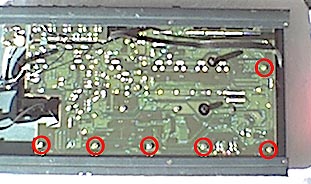
2: Remove the gold colored screws from beneath the footswitches and the 2 on the bank sw, also in red (that's why you can't pull the switches off the front). Keep the screws in your container.
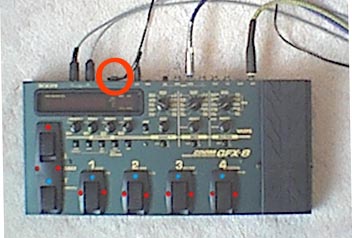
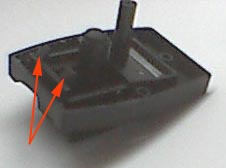
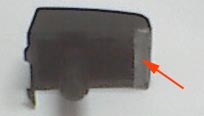
3: Turn the unit over again (face up) and remove the black screws from the front of the footswitches - 2 each - 3 on the bank up/down sw (red dots in picture 1). Gently lift the switches and switch housing off being careful not to lose the LED stalks (these are clear plastic stalks that bring the red light from the surface mount LED on the board up to the front panel - arrow pic 2) - blue dots in picture 1. Lift these off and put them in your container. While looking at this picture 1, note the 'strain relief' circled in red below - use it! - wrap your ac lead once around it, so next time the bass player trips over your power cord, he doesn't break off the circuit board inside the GFX! Really, use it!
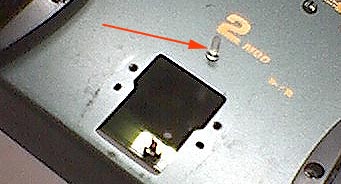
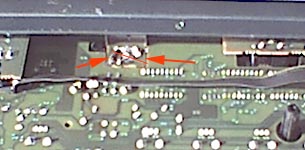
3a: While the back cover is off, take a look at the circuit board where the ac power socket joins - check for any cracks. Note the 2 slots in the circuit board (red arrows in picture below), this makes it weak, and mine had cracked along the thin red line as in the picture (no you jerk there's no red line on your circuit board, I put it in the pic to show where mine was cracked), if you're having power trouble (GFX occasionally loses power and comes back on when you wiggle the power connector) then look here. This is the subject of another page, and since it involves removing the circuit board, and some careful soldering, it may be best to get a repair shop or an electronics friend to do it.
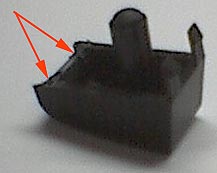
4: There are 2 tabs on the front side of the switch housing (red arrows, pic 1 below), which hold the switch in the housing. VERY CAREFULLY squeeze these in so the switch will pop out (see pic 2 below). These are designed to be used once, but you should get away with it if you're gentle. Do not bend them too far. Pop the switch out, lift out the springs and store them in your container and have a look at the hinge end of the switch. There is a piece of very thin plastic taking all the strain at the bottom side. This is the part that breaks off and has to be either repaired or strengthened. Incidently did you notice how stiff the springs are? I've replaced mine with springs about half the stiffness (from an electrical supply store or a watchmaker) and the action is very acceptable.
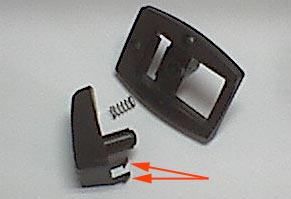
5: Check the hinge end of the switch, and if it's cracked or broken (arrows, pic 1 below), then glue the crack first. I've found that Humbrol model aeroplane glue works, but any good plastic glue, superglue or 2-part epoxy should do it. After the cracks are fixed, cut a small piece of thin plastic to fit over the bottom of the hinge part (arrow, pic 2 below) - I used the plactic from a broken cd case - anything thicker and it won't fit back in. Don't get any glue in the hole where the hinge goes, or you'll have to clean it out before re-fitting.
6: Etc etc blah blah gotta go will finish this later ...... how to put it back together ... basically tho a reverse of the above procedure. Hold this page up against a mirror ..... ;->
I see you shiver with antici........
..... pation. |
||||||
You can reach me by e-mail at: My Hotmail Address - vic77@hotmail.com |